
Ear seeds are a simple, needle-free way to support your wellness routine. They are small seeds or beads placed on specific points on the outer ear, where they can be gently pressed throughout the day. Many people use ear seeds at home as a way to continue the benefits of acupuncture or acupressure between appointments.
If you’ve been curious about how to use ear seeds, this guide will walk you through what they are, where they come from, and how to use them safely and comfortably.
What are ear seeds?
Ear seeds are tiny adhesive patches placed on specific acupoints of the ear. Traditionally, the “seed” was a small seed from the Vaccaria plant, which is where the name comes from. Today, ear seeds may also be made from stainless steel, gold-plated metal, ceramic, or other small smooth beads.
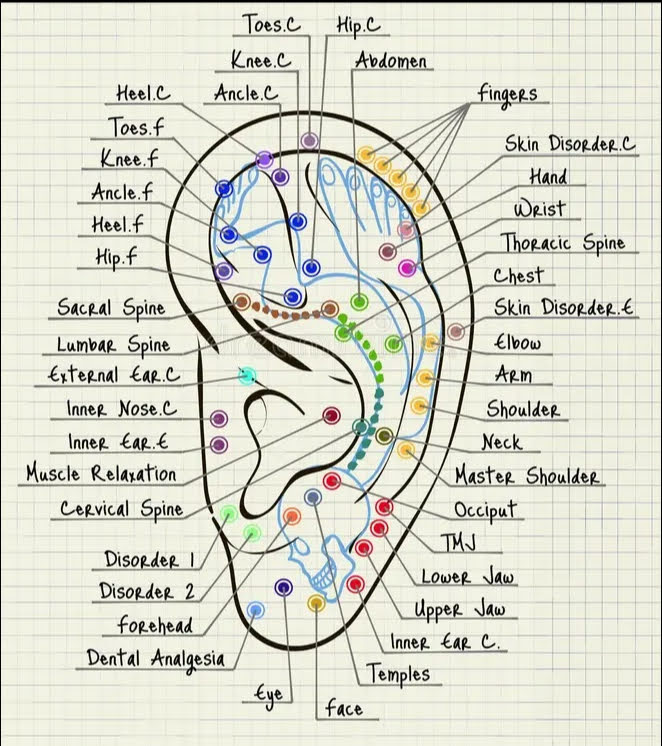
In Traditional Chinese Medicine, the ear is viewed as a microsystem that reflects the whole body. That means specific points on the ear are thought to correspond with different areas and functions in the body. Ear seeds are used as a gentle way to stimulate those points without needles.
A brief history of ear seeds
The use of the ear in healing has a long history in Traditional Chinese Medicine, and ear-based therapy has also been developed in modern practice through auriculotherapy. The modern form of auriculotherapy became better known in the 20th century, when practitioners began mapping points on the ear more systematically.
Today, ear seeds are used around the world as a simple, low-cost wellness tool. People often choose them because they are easy to wear, non-invasive, and can be used at home with proper guidance.
How Auriculotherapy can help
Auriculotherapy is used to treat a wide range of conditions, including pain, stress, anxiety, digestive issues, and more. It can be used as a complement to other forms of acupuncture or as a standalone treatment.
The seeds or beads are applied to the ear using adhesive stickers. Once in place, they can be pressed gently to stimulate the points, and they typically stay in place for several days. The idea is that continuous mild pressure will help to stimulate the acupuncture points over time.
Using ear seeds is less invasive than traditional needle acupuncture and can be a convenient option for patients to manage symptoms on their own. It’s also useful for extending the benefits of a professional acupuncture session.
How to use ear seeds at home
Often the seeds will be applied in the office by your therapist. However, in some cases you may have been sent home with extra seeds to apply at home. Once you get the hang of it, ear seeds are easy to apply. You will need a few basic supplies:
- rubbing alcohol
- cotton swabs or some facial tissue
- tweezers
- a mirror
- instructions or a guide on where to place the seeds
Watch this short video to see how to apply the seeds at home.
Steps for Application
Using ear seeds at home is usually quite simple. Still, it helps to follow a few basic steps so they stay in place and feel comfortable.
Step 1: Clean and dry the ear
Before applying ear seeds, make sure the outer ear is clean and dry. Oils, lotion, makeup, and sweat can make it harder for the adhesive to stick.
Step 2: Find the right point
Each seed is placed on specific points of the ear depending on your goal. These might be points selected for stress, sleep, tension, digestion, or general balance. If you are new to auriculotherapy, it is best to have a practitioner show you where to place them before trying them on your own.
Step 3: Apply the seed
Using clean hands or tweezers, place the seed on the chosen point and press it gently into place. Avoid touching the adhesive too much, as this can reduce how well it sticks.
Step 4: Press gently
Once the seeds are in place, you can gently press on them for a few seconds at a time. Many people do this several times a day. The pressure should feel noticeable but comfortable, not painful.
Step 5: Leave them on for a few days
Ear seeds are often worn for about 3 to 5 days, though this can vary depending on the product and your skin sensitivity. If the area becomes irritated, remove them sooner.
Step 6: Remove carefully
To remove ear seeds, gently peel off the adhesive. If any residue remains, you can clean the area with warm water or a mild cleanser.
Tips for using ear seeds safely
Ear seeds are generally well tolerated, but a few simple precautions are helpful.
- Do not place them inside the ear canal.
- Avoid using them on broken, irritated, or infected skin.
- Remove them if you notice itching, redness, or discomfort.
- Use extra caution if you have sensitive skin or allergies to adhesives.
- If you are pregnant, have a medical condition, or are unsure which points are appropriate, check with a qualified practitioner first.
Why people use ear seeds
People use ear seeds for many different reasons. Some use them as part of a relaxation routine, while others find them helpful between acupuncture treatments. They are often chosen because they are easy to wear discreetly and can be pressed throughout the day for a gentle reminder to check in with the body.
Ear seeds in Calgary
If you are looking for earseeds in Calgary, you may want guidance from a practitioner who can help you choose the right points and show you how to use them properly. In-clinic support can be especially helpful if you are new to auriculotherapy or want to use it for a specific wellness goal.
At my NE Calgary clinic, ear seeds can be offered as part of a personalized acupuncture or wellness treatment plan. I can also show you how to use ear seeds at home so you feel confident applying and caring for them between visits.
Frequently asked questions
You can usually press them gently a few times a day, or whenever you want to reconnect with the point. The pressure should always feel mild and comfortable.
Many ear seeds are worn for 3 to 5 days. If your skin feels sensitive, remove them sooner.
Yes, many people use ear seeds at home. It helps to learn where to place them first, especially if you are using them for a specific purpose.
They should not be painful. You may feel a small amount of pressure or tenderness when you press them, but they should not cause strong discomfort.
Yes, ear seeds are available in Calgary as part of acupuncture and wellness care. A practitioner can help you choose the right points and show you how to use them safely.
Ear seeds are a gentle, accessible way to support your wellness routine at home. Whether you are new to acupuncture or simply want a simple tool to use between visits, ear seeds can be an easy addition to your self-care practice.
If you are interested in ear seeds in Calgary, I’d be happy to help you learn how to use them and find the best approach for your needs.
Learn More About Acupuncture in NE Calgary
Book a consultation or an acupuncture session in NE Calgary and get personalized support for menopause, headaches, and overall wellness.
Book Your Appointment


References:
For more information about types of ear seeds: https://www.earseeds.com/about/


[…] Ear seeds are small plant seeds or metal balls that are placed over acupuncture points on the ears. This is a way to stimulate acupuncture points without using needles. It can be used as an alternative to needles or as a take-home way to extend the benefits of your treatment. To learn more, check out this post: Auricular Therapy […]